Next.js Bootstrap
This template provides a Next.js application set up to use Bootstrap styling that is deployed to AWS using the CloudFront CDN and Lambda@Edge.
Features
Bootstrap styling for Next.js application
Use react-bootstrap to style components in your Next.js application using Bootstrap.
Configured for TypeScript
Use TypeScript in your project. Configured to use a TypeScript monorepo to easily combine front-end and back-end code in one repository.
Jest and React Testing Library
Test the components and pages in your Next.js project using Jest and React Testing Library.
Ready for Deployment to AWS.
Scalable AWS infrastructure defined in Terraform; all content served through the powerful CloudFront CDN and stored in S3 at very low costs. See this blog article for more information about the infrastructure setup.
Getting Started
1. Project Setup
Before using this template, you need to configure the project. For this, please see the Getting Started Guide on the Goldstack documentation.
2. Setup Infrastructure
To stand up the infrastructure for this module, find the directory for this module in the packages/ folder and navigate to this folder in the command line. Then identify the name of the deployment you have defined in the Goldstack configuration tool. This can be found in the packages/[moduleName]/goldstack.json file. Look for the "deployments" property and there for the "name" of the first deployment. The name should either be dev or prod.
In order to stand up the infrastructure, run the following command:
yarn infra up [deploymentName]
This will be either yarn infra up dev or yarn infra up prod depending on your choice of deployment. Note that running this command can take a while.
3. Deploy Application
Once the infrastructure is successfully set up in AWS using yarn infra up, we can deploy the module. For this, simply run the following command:
yarn deploy [deploymentName]
This will either be yarn deploy dev or yarn deploy prod depending on your choice of deployment during project configuration.
4. Development
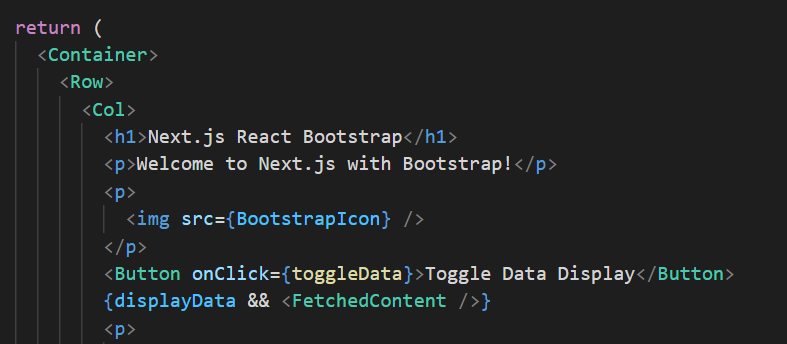
Goldstack's Next.js template is a simple wrapper around a standard Next.js project. Please see the Next.js documentation for details on how to develop a Next.js application. Generally, the folder src/pages is a good starting point.
Configure
The following key properties need to be configured for this template:
- Hosted Zone Domain: A Route 53 hosted zone to which the Primary Website Domain and Redirect Website Domain can be added as records. For instance, the hosted zone domain
mysite.comwould allow adding the primary domainmysite.comand the redirect domainwww.mysite.com. For more details, please check Hosted Zone Configuration in the Goldstack documentation. - Primary Website Domain: This is the domain your users will use to view the site. For instance, if you configure the domain
mysite.com, users will be able to view your site by opening the URLhttps://mysite.com. - Redirect Website Domain: This is a domain that will redirect all requests to your Primary Website Domain. The redirect website domain must be different to the Primary Website Domain. For instance, if you configure the domain
mysite.comas your primary domain, you can configurewww.mysite.comas your redirect domain. Users will be redirected tohttps://mysite.comwhen they attempt to open the URLhttps://www.mysite.com. - Default Cache Duration: The number of seconds that files will be cached in the AWS content delivery network. Setting this to
120for instance, would mean that, unless otherwise specified, webpages and other resources will be cached for 120 s. In that case, when a new version of a page is deployed, it can take up to 120 s for changes to appear when accessing the deployed version of the application.
- Environment Variables: Configures environment variables for the application. Environment variables without the prefix
NEXT_PUBLIC_will only be available during build time of the application. For more information see Environment Variables in the Next.js documentation.
Infrastructure
All infrastructure for this module is defined in Terraform. You can find the Terraform files for this template in the directory [moduleDir]/infra/aws. You can define multiple deployments for this template, for instance for development, staging and production environments.
If you configured AWS deployment before downloading your project, the deployments and their respective configurations are defined in [moduleDir]/goldstack.json.
The configuration tool will define one deployment. This will be either dev or prod depending on your choice during project configuration. In the example goldstack.json below, a deployment with the name dev is defined.
{
  "$schema": "./schemas/package.schema.json",
  "name": "...",
  "template": "...",
  "templateVersion": "...",
  "configuration": {},
  "deployments": [
    {
      "name": "dev",
      "awsRegion": "us-west-2",
      "awsUser": "awsUser",
      "configuration": {
        ...
      }
    }
  ]
}
Infrastructure Commands
Infrastructure commands for this template can be run using yarn. The following commands are supported:
yarn infra up: For standing up infrastructure.yarn infra init: For initialising Terraform.yarn infra plan: For running Terraform plan.yarn infra apply: For running Terraform apply.yarn infra destroy: For destroying all infrastructure using Terraform destroy.yarn infra upgrade: For upgrading the Terraform versions (supported by the template). To upgrade to an arbitrary version, useyarn infra terraform.yarn infra terraform: For running arbitrary Terraform commands.yarn infra is-up: Will returnis-up: trueif infrastructure for a deployment exists, otherwise returnsis-up: false
For each command, the deployment they should be applied to must be specified.
yarn infra [command] [deploymentName]
For instance, to stand up the infrastructure for the dev deployment, the following command would need to be issued:
yarn infra up dev
Generally you will only need to run yarn infra up. However, if you are familiar with Terraform and want more fine-grained control over the deployment of your infrastructure, you can also use the other commands as required.
Note that for running yarn infra terraform, you will need to specify which command line arguments you want to provide to Terraform. By default, no extra arguments are provided:
yarn infra terraform [deployment] plan
If extra arguments are needed, such as variables, you can use the --inject-variables option, such as for running terraform plan:
yarn infra terraform [deployment] --inject-variables plan
If you want to interact with the remote backend, you can also provide the --inject-backend-config option, such as for running terraform init:
yarn infra terraform [deployment] --inject-backend-config init
By default, if you provide a deployment name that does not exist, the command will fail. In CI environments or for larger projects, it sometimes makes sense to run yarn infra xx over the whole project and skip packages for which the deployment is not defined. In that case, you can use the following flag:
yarn infra [command] [deployment] --ignore-missing-deployments
Now the CLI will output a warning if the deployment does not exist but not an error.
Customizing Terraform
Goldstack templates make it very easy to customize infrastructure to your specific needs. The easiest way to do this is to simply edit the *.tf files in the infra/aws folder. You can make the changes you need and then run yarn infra up [deploymentName] to apply the changes.
The infra/aws folder contains a file variables.tf that contains the variables required for your deployment; for instance the domain name for a website.
Note: Variables defined in variables.tf do not need to be present in goldstack.json. If a variable is not defined in goldstack.json, Goldstack will automatically attempt to resolve its value from environment variables or .env files. This is useful for sensitive values that should not be committed to source control.
To add a new variable:
- Add the variable to
variables.tf - Optionally add it to the
configurationingoldstack.json(or provide via environment variables/.envfiles)
Note that due to JavaScript and Terraform using different conventions for naming variables, Goldstack applies a basic transformation to variable names. Camel-case variables names are converted to valid variables names for Terraform by replacing every instance of a capital letter C with _c in the variable name. For instance:
myVariableName in the Goldstack configuration will translate to the Terraform variable my_variable_name as defined in variables.tf.
Providing Terraform Variables
Terraform variables can be provided through multiple sources:
goldstack.jsonconfiguration files (recommended for most values)- Environment variables (
process.env) .envfiles (useful for sensitive values)
Using goldstack.json
Define variables in the configuration property of your goldstack.json. There is one global configuration property that applies for all deployments, and each deployment can have its own configuration property.
Using Environment Variables
For a variable named my_var in variables.tf, set the environment variable MY_VAR:
MY_VAR=value yarn infra up prod
Using .env Files
You can also provide Terraform variable values through .env files. Goldstack will load .env files from both the monorepo root and the package directory in the following order (later files override earlier ones):
root/.env- Shared across all deploymentsroot/.env.[deployment]- Deployment-specific (e.g.,.env.prod)package/.env- Package-specific shared valuespackage/.env.[deployment]- Package and deployment-specific (highest priority)
For example, if you have a Terraform variable my_var defined in variables.tf, you can provide its value by adding to your .env file:
MY_VAR=my-value
Note that environment variable names should be uppercase versions of the Terraform variable names (e.g., my_var → MY_VAR).
Variable Resolution Priority
When resolving Terraform variable values, Goldstack uses the following priority (from highest to lowest):
- Values defined in
goldstack.jsonconfigurations - Environment variables (
process.env) - Values from
.envfiles
If a variable defined in variables.tf is not found in any of these sources, a warning will be logged.
Terraform State
In order to manage your infrastructure, Terraform maintains a state for each deployment; to calculate required changes when the infrastructure is updated and also for destroying the infrastructure if it is no longer required. Goldstack by default will store the terraform state in the infra/aws folder as simple files.
This works well for deploying infrastructure from your local development environment but is not a good choice when building a CI/CD pipeline for the infrastructure definition. In that case, it is better to define Remote State. A popular choice many projects adopt here is to store the state in an S3 bucket. Please see the Terraform documentation for further details.
Deployment
This template can be packaged up and deployed to the deployments specified in goldstack.json. Note that deployment will only work after the infrastructure for the respective deployment has been stood up. To deploy your package, run the following script:
yarn deploy [deploymentName]
This command supports the flag --ignore-missing-deployments. If this is not provided, the command will fail if the deployment does not exist. If the flag is provided, only a warning will be shown. This is useful if not all components of an application are required for all deployments.
Vercel Deployment
The Goldstack Next.js template can easily be deployed to Vercel.
1. Sign Up to Vercel
You need to create a vercel account if you do not have one already. Use your GitHub account to sign up to Vercel. Your project must be defined in a GitHub repository on this account.
2. Configure Project
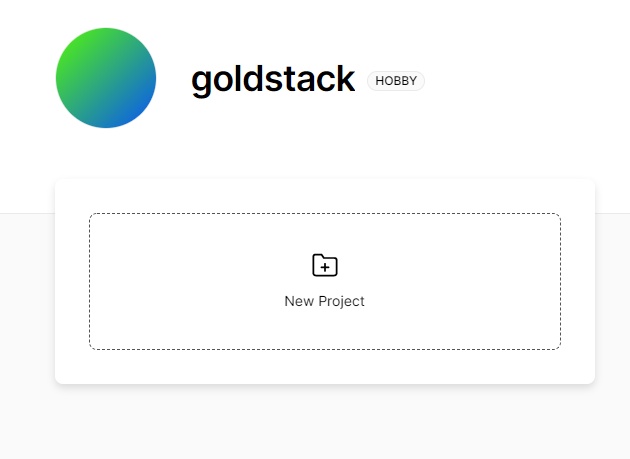
Click on New Project on the Vercel dashboard to create a new project.
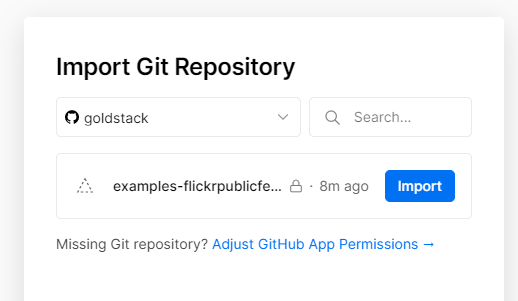
Grant Vercel access to the GitHub repository you want to deploy.
Then click on Import to import this repository.
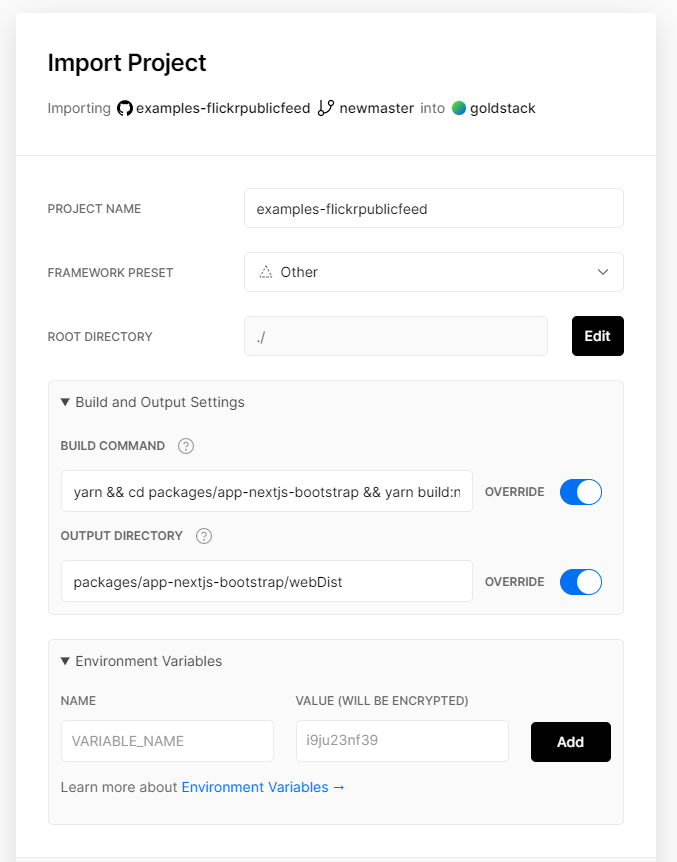
Add the project to your personal account. Select the root directory of your project as the source code to import (not the directory of the package with the Next.js application).
Click to extend Build and Output Settings and provide the following build command:
yarn && yarn build && cd packages/app-nextjs-bootstrap && yarn build:next
Also change the output directory:
packages/app-nextjs-bootstrap/webDist
Ensure to replace app-nextjs-bootstrap with the name to the Next.js package you want to deploy in the two values above.
Provide environment variables if you have defined any.
Click Deploy to trigger the deployment. Your application should now be deployed under a vercel.appdomain.
For more information, see the Vercel Documentation.
Limitations for AWS Deployments
Goldstack's Next.js modules enable deploying Next.js applications to a serverless AWS infrastructure. The advantage of this is that you get a very low cost, highly scalable and enterprise ready deployment for the Next.js application. However, serverless AWS infrastructure is structurally different to deployments on Vercel or deployments as stand alone Node.js applications. Thus there are a couple of limitations to keep in mind when working with this template:
- API Routes are not supported. If you need a backend, we recommend adding our Lambda Express template to your project.
- When standing up infrastructure for this template, a new certificate will be automatically obtained from AWS Certificate Manager. AWS has a default limit of the number of SSL certificates per account. If you are reaching this limit, you can simply make a service request with AWS to increase it.
- Pre-fetching does not work in some situations, for instance when statically rendering pages using
getStaticPaths. As a workaround, we recommend not using Link components for these routes and instead use vanillaaelements. - Files added to the
public/folder may not be served correctly. Configure the CloudFront distribution as described here to make the files available. - Delay in deploying new dynamic routes. Since dynamic routes are implemented using Lambda@Edge functions, it can take a while for dynamic routes to start working. This is because once a new dynamic routes is added, a new Lambda@Edge function needs to be deployed. You can check the state of the CloudFront distribution in the AWS console. If no new dynamic routes have been added, everything should work as expected directly after the deployment.
- Next.js
<Image>component is not supported, see Next.js Image loader. Useimginstead. The project is already set up to use next-optimized-images which you can configure for optimising various image types. - Redirect domain configured as CNAME rather than its own bucket and CloudFront distribution due to this know limitation
- No support for a dynamic route and pages in the same directory. When creating both normal pages and a dynamic route in a directory, the dynamic route will always be loaded first. For instance, given the following two files:
[id].tsx
dummy.tsx
When accessing /dummy, [id.tsx] will be loaded. This does not apply to the index.html, which will still be loaded correctly under the root /.
Workaround:
Place dynamic routes into sub directories, such as:
[id]/index.tsx
dummy.tsx
There may be other issues in various edge scenarios. If you come across these, raise an issue or contact support.
Troubleshooting and Frequently Asked Questions
404 Not found for files in public folder
Next.js supports static file serving by placing files into a public/ folder. This is useful for files such as favicon.ico. This module by default provides support for favicon.ico files but if you want to add other files, these may not be captured by the CloudFront behaviours configured in Terraform.
Next.js may try to resolve these files as dynamic paths, which may result in the files not being found. To fix this, go into infra/aws/root.tf and add additional ordered_cache_behaviours as required.
For instance, if you want to serve a file /myfile.png provided in public/myfile.png and this file should be cached in CloudFront, add the following behaviour:
  ordered_cache_behavior {
    path_pattern     = "myfile.png"
    allowed_methods  = ["GET", "HEAD", "OPTIONS"]
    cached_methods   = ["GET", "HEAD", "OPTIONS"]
    target_origin_id = "origin-bucket-${aws_s3_bucket.website_root.id}"

    forwarded_values {
      query_string = false
      headers      = ["Origin"]

      cookies {
        forward = "none"
      }
    }

    min_ttl                = 0
    default_ttl            = 86400
    max_ttl                = 31536000
    compress               = true
    viewer_protocol_policy = "redirect-to-https"
  }
If you would like all files in /myfolder provided in the folder public/myfolder and not cache these, provide the following behaviour:
  ordered_cache_behavior {
    path_pattern     = "myfolder/*"
    allowed_methods  = ["GET", "HEAD", "OPTIONS"]
    cached_methods   = ["GET", "HEAD", "OPTIONS"]
    target_origin_id = "origin-bucket-${aws_s3_bucket.website_root.id}"

    forwarded_values {
      query_string = false
      headers      = ["Origin"]

      cookies {
        forward = "none"
      }
    }

    min_ttl                = 0
    default_ttl            = tostring(var.default_cache_duration)
    max_ttl                = 1200
    compress               = true
    viewer_protocol_policy = "redirect-to-https"
  }
'502 ERROR The request could not be satisfied' when opening page
Instead of seeing the page, you may see an error message like the following:
502 ERROR
The request could not be satisfied.
The Lambda function returned invalid json: The json output must be an object type. We can't connect to the server for this app or website at this time. There might be too much traffic or a configuration error. Try again later, or contact the app or website owner.
If you provide content to customers through CloudFront, you can find steps to troubleshoot and help prevent this error by reviewing the CloudFront documentation.
Generated by cloudfront (CloudFront)
Request ID: JIQQuxOxsXdcyHuUKxbA88YeFs_NH0h7B6xbG-SZFN88byb5WffF0A==
This is most likely due to the deployment not having worked correctly. Try deploying the package again with yarn deploy [deploymentName].
AccessDenied error when setting up infrastructure
When running `yarn infra up [deploymentName], you may get AccessDenied errors such as the following:
Error: error getting S3 Bucket CORS configuration: AccessDenied: Access Denied
        status code: 403, request id: 1Z1VFR1N5RAMFZ9W, host id: mYdqmUJ8Vo+t845tuW9NNYF8WVnKxlbynRAir4BoMKHKB5kcFjM3uiGkJpQAHGHxusa6sHzcazs=
There are a number of possible causes for this:
- You may have configured your AWS user incorrectly. Please see AWS Configuration for details on how to configure your AWS user.
- You may accidently have a Terraform state in your module. That can happen if you create new modules by copy and pasting from an existing module. In this case, delete the following two folders in your module:
infra/aws/.terraformandinfra/aws/terraform.tfstate.d.
Error deleting Lambda Function
Sometimes when running yarn infra destroy [deploymentName] Terraform reports an error that the edge lambda cannot be deleted.
Error: Error deleting Lambda Function: InvalidParameterValueException: Lambda was unable to delete arn:aws:lambda:us-east-1:475629728374:function:[function name]-edge:2 because it is a replicated function. Please see our documentation for Deleting Lambda@Edge Functions and Replicas
In that case, simply run yarn infra destroy [deploymentName] again until it is successful.
Error: error creating CloudFront Distribution: AccessDenied
When standing up the infrastructure, the following error may be displayed:
Error: error creating CloudFront Distribution: AccessDenied: Your account must be verified before you can add
new CloudFront resources. To verify your account, please contact AWS Support (https://console.aws.amazon.com/support/home#/) and include this error message.
│       status code: 403, request id: xxx
│
│   with aws_cloudfront_distribution.website_cdn_root,
│   on root.tf line 45, in resource "aws_cloudfront_distribution" "website_cdn_root":
│   45: resource "aws_cloudfront_distribution" "website_cdn_root" {
This must be resolved by raising a request with AWS as follows:
- Create a new Service Limit Increase Case
- Limit Type: choose
CloudFront Distributions - Distribution Id: leave empty
- Limit: choose
Web Distributions per Account
- Limit Type: choose
- Wait for a few hours until your request is approved
Security Hardening
Here are a number of ways how the configuration for this module can be changed to enhance security:
- In
infra/aws/edge.tffor theresource "aws_iam_policy" "lambda_logging"you can further restrict the access rights to write log events:"Resource": "arn:aws:logs:*:*:*".